Wednesday, August 21, 2013

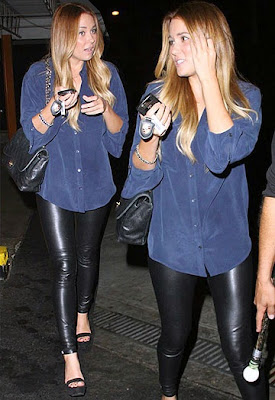
Fall Trend: Navy and Black


This morning my friend Courtney posted a question on her Facebook:  "fall style question of the day: how do you feel about mixing navy and black? i can't quite decide..." I told her to "Pinterest" it to see how she felt about it, but I decided to do some research for myself. So here ya go Court, this is what I found!

via

via
via


via
It seems like the way to wear this trend is to wear predominately one color then pair one piece of the other color. I think it actually works this way as opposed to mixing equal parts of black and blue. I may have actually changed my mind on this trend. It seems very classic! 

What do you think? Would you wear black and blue together?


WIWW: Stripes and Lace

Well, after one set back after another, I decided to step out of the 30x30 project for this month. I am already gearing up for the fall project, so hopefully I can stay on track with that!

That being said, here is a picture I had taken for the 30x30 project that I will use for today's installment of What I Wore Wednesday. This outfit is a great way to turn a summer dress into a fall outfit (well, at least fall in Florida where it doesn't get too hot!).

I have some great posts in the works so stay tuned for those in the coming days!


Dress: Gap, similar
Lace top: Loft, similar
Boots: Corral, similar
Necklace: Unknown brand, similar

How do you plan on changing summer items over for fall?

Linking up to: Raegun Wear, Tucker Up, and Because Shanna Said So.

Tuesday, August 6, 2013

DIY Anchor Tank

When I started prepping for my 30x30 project, I knew I wanted some sort of graphic tank, and had been looking for an anchor tank for some time. I couldn't find one that was EXACTLY what I wanted for what I wanted to spend, so I set out to make my own.

I bought this tank at Target for about $15. It is actually a workout tank, but had the length and shape and color that I wanted, so I bought it (also knowing that it's breathable quality would be perfect for our upcoming Disney trip).


So how did I make it?
Step One: Insert cardboard inside the shirt. This will keep the bleach from bleeding through the shirt and onto whatever you put it on.


Step Two: Use a bleach pen (I used Clorox because that was what I could find) to draw out your pattern. I did a simple anchor, but you could do just about any pattern you want!


Step Three: Let the bleach dry over night (or all day if you do it in the AM). It will flake off when it is completely dry.


Mine was not as vivid as I wanted it to be after the first try. I think this is due to the type of fabric.
So in my case, Step Four would be repeat the bleach step!


Here is my completed shirt! It isn't perfect for sure, and I may even go back and make the design thicker, but I am pretty happy with how it turned out. I can't wait to style it for the 30x30 challenge!

Linking up to: Rae Gun Ramblings, This Gal Cooks, I Gotta Try That, and Sew Much Crafting.

Monday, August 5, 2013

Disney Craft

I can't believe I haven't blogged about this before, but Ben and I are taking a week long trip to Disney World in September. We were given the trip as a wedding gift by two very good friends! We will be staying 6 nights at the Animal Kingdom resort on the Disney property and we are SO excited! I have been actively researching what to do for our trip, and one of the things I came across was a count-down calendar. I instantly knew I wanted to make one and set to work. 


I already had this shadow box on hand so I wanted to use it. (Please excuse the dirt on the frame-it has been in storage since we moved a year ago).


I bought some craft paper in Disney-theme colors to use as the background. I got the paper onsale from Hobby Lobby and I think I paid less than a dollar for all 3 sheets.


The first sheet was the perfect size for the frame (12x12) so all I had to do was tape it down to the frame. You could not attach it or use scrapbook tape or even straight pins, but I went with scotch tape because that was what I had on hand.


I didn't use any specific measurements when I cut the paper. I just lined it up until one side looked like what I wanted and cut that off, then made a square. I would definitely recommend using some sort of paper cutter for this part of the project. I actually attempted it one time prior just using scissors, and let's just say it wasn't pretty.


After I cut the paper to the size I wanted, I attached it to the paper below it.


I knew I wanted some Mickey ears as well as a Disney font. I started with just the Mickey ears and tried to write out my own font, but it was not as pretty as I wanted it to be. I began to search around and found a Disney font generator online. I typed in the words one at a time and pasted them, along with the Mickey ears, into a Word document. I played around with the size until it looked perfect, then printed it out. I cut the page down to size and attached it to the other 2 sheets.

Please excuse the poor lighting and yellow looking wall color. Its actually a tan but I think I am painting it soon!

Here is the finished product hanging on the walls! Since it is in a glass frame, I can use a dry-erase marker to change the date out every day. I can't wait to re-use this frame for other events we have coming up! What do you think? Would you make a count-down calendar?  What big events are you counting down to?

Sources: I found the Mickey ears here. Click here for the Disney font generator.

I also am including the printable I used so you don't have to go through all the trouble! Feel free to use it. Please send me any projects you use it for so I can see them! Click here for the download.

Linking up to: Marvelous Mondays, I Gotta Try That, and Funday Mondays.


Friday, August 2, 2013

Friday Fancies: Short and Sweet

This week's Friday Fancies' theme was "Short and Sweet." It focuses on shorts, which are a daily staple here in Florida. For my board, I wanted to pick something summery and vaguely nautical without being too literal. I started with the lace shorts and knew I wanted to pair it with a blue and white stripe top. I chose the tan wedge for its versatility. The turquoise and gold accessories are the perfect nod to the beach without screaming "I'm Beachy!".

Friday Fancies: Short and Sweet


Linking up to Long Distance Loving and XoXoRebecca
Related Posts Plugin for WordPress, Blogger...